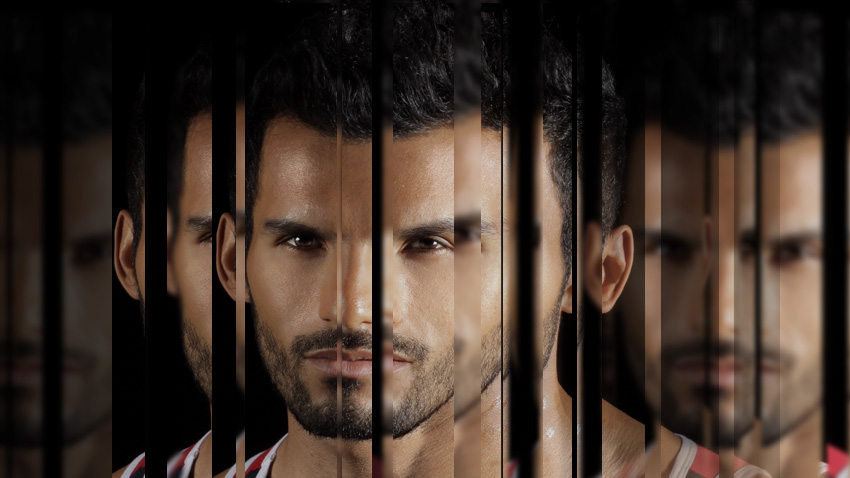
In this tutorial, we take a look at an easy way to simulate this effect using Photoshop.
1. Preparing the Effect
The original effect in the video features the singer against a solid black background. The fragmented reflections are intentionally arranged so the face is still recognizable. Those two elements seem minor but are important to the success of the final effect.
Step 1
The starter photo is important. I decided to stay in the same vein as the source material and use a male portrait against a solid black background. Envato Market provided an excellent option with this image of a Handsome Man.

Step 2
Open the photo in Photoshop and use the Crop Tool (C) to crop the image down to be just the head and neck. It's important to leave plenty of horizontal space to build the effect into, and to match the widescreen format seen in the video.

Step 3
Create a copy of the background layer with Layer > New > Layer Via Copy (Control-J).

Step 4
Create a new layer with Layer > New > New Layer (Shift-Control-N), name the layer Black, and place this blank layer between the Background and Layer 1 in the Layers panel.

Step 5
Go to Edit > Fill and use Black for the Content setting to fill the blank layer with solid black.

2. Creating Slices
The actual fragmenting of the reflection is a fairly simple, and repetitive, process. The key to making this work well is to use a good variety of thicknesses for the slices.
Step 1
Make sure that Layer 1 is the current layer and use the Rectangular Marquee Tool (M) to create a tall, narrow rectangular selection around the man's right ear.

Step 2
Go to Layer > New > Layer Via Cut (Shift-Control-J) to cut the selection out and place it on a new layer.

Step 3
Hide this new layer by clicking on the eye icon next to the layer thumbnail.

Step 4
Repeat the process of creating about ten or so slices from Layer 1, working from left to right until you reach his other shoulder.

Step 5
Hide the Layer 1 and reveal all of the slice layers.

Step 6
Select the leftmost slice (it is likely named Layer 2) and use the Move Tool (V)to move the slice to the far left of the canvas. Then move the rightmost slice to the far right edge of the canvas.

Step 7
Hold down the Shift key while clicking on the slice layer thumbnails to select all the slices. Then go to Layer > Distribute > Horizontal Centers. This should spread the slices across the span of the canvas.

Step 8
With all the slices still selected, go to Layer > Group Layers (Control-G) to place all of them into a single group. Rename the group Mirror 1.

3. Duplicate the Effect
At this point, the basic effect is done. But it is just that, basic. To make the entire piece visually engaging, it needs several of these fractal mirrors, and some important visual distinction between them.
Step 1
Right click on the Mirror 1 layer group and select Duplicate Group to create a copy of the entire group. Leave the name as the default Mirror 1 copy. Then right click again and choose Convert to Smart Object.

Step 2
Go to Filter > Blur > Gaussian Blur and use a blur Radius of 2.5 px.

Step 3
Use the Move Tool (V) to reposition the Mirror 1 copy to the left to fill in some of the gaps left by the original fragmented mirror. Then tap the Up Arrow key a couple of times to give a slight vertical offset.

Step 4
Duplicate the smart object with Layer > Duplicate Layer. Name this new smart object Mirror 3 and then move it over to fill in much of the right side of the canvas. In the Layers panel, put this object beneath the Mirror 1 copy.

Step 5
Create another fragmented mirror by using the same technique as before, creating slices from a copy of the background layer, distributing them across the canvas, and grouping them together into a group called Mirror 4. Take care that this iteration has significantly different size slices than the first one did.

Step 6
Duplicate the Mirror 4 group by right clicking and selecting Duplicate Group. Then Convert it to a Smart Object by using the same right-click context menu.

Step 7
Go to Filter > Blur > Gaussian Blur and use a Radius of 3 pixels. Then move this group to the far right and place it below the Mirror 4 group in the Layerspanel.

Step 8
Select the Mirror 4 group and add a layer mask with Layer > Layer Mask > Reveal All. Then use the Gradient Tool (G) with a Linear gradient and the preset of Black, White to draw out a gradient starting at the far right and ending near the center of the canvas. This fades out the mirror effect from this group and allows the one from beneath it to be visible.

Step 9
Duplicate the Mirror 4 copy smart object, move it to the far left, and reduce the Opacity to 30%. Then position it below the Mirror 1 group in the Layerspanel.

Step 10
Add a Hue/Saturation adjustment layer to the very top of the stack. Set theSaturation to -27 and the Lightness to -13.

You Are Done!
Ultimately, this effect is relatively simple to create but does require good management of lots of layers. But as long as you use layer groups and smart objects to keep things tidy, crafting the effect on any image shouldn't be a problem!

Comments
Post a Comment